General operation of the detail page
In this chapter, we will describe the different parts of a Craft CMS detail page in general. These parts are used in many different places in the Control Panel. Such as, in the menu Entries, Categories, Assets and Users. The way how they operate is largely the same everywhere.
# Multisite & Revisions
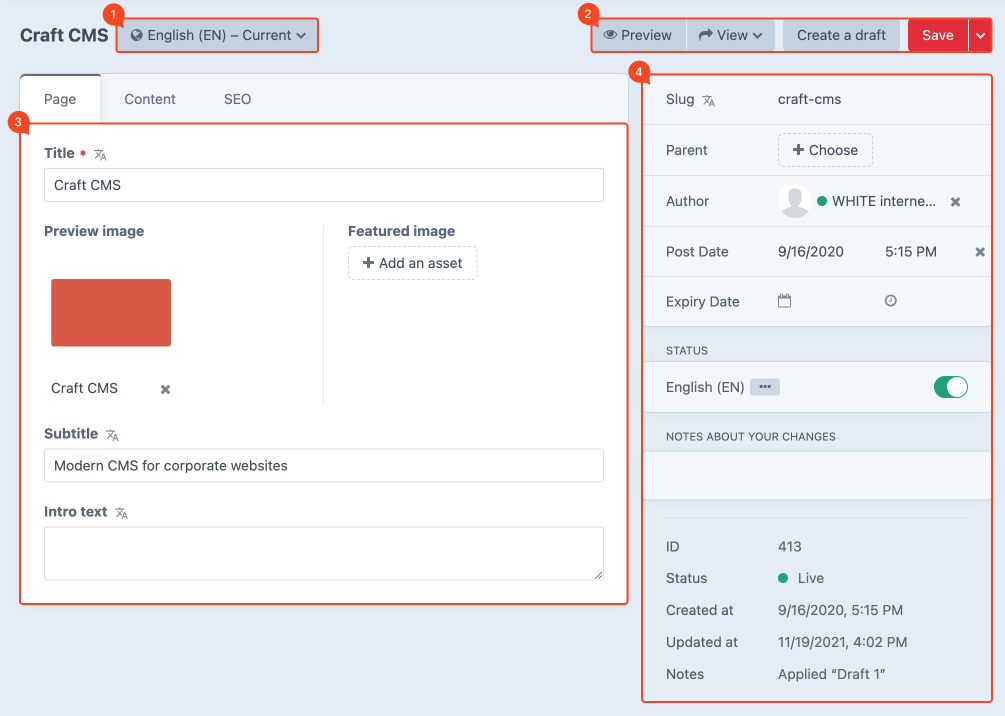
(regarding block 1)
As described in the chapter General operation of the overview page, the button next to the title is a multifunctional button. Depending on what you have chosen before arriving at this detail page, the system determines what options you still have here.
# Multisite
An article (entry) may be available for multiple sites. In that case, a globe symbol appears in the button. Switch from site for which you want to edit the article.
Multisite is an umbrella term for multiple sites within a single Craft environment. Another language is seen by Craft as a separate site.

# Revisions
Under the multisite button, you can also find a list of all the dates when an item was edited. After saving, it will be added to the list. The list can go back to 50 moments in time.
Whether you have the possibility of revisions depends on the settings made by the developer. This also applies to how many instances you can go back in time.
When you click on a line with a certain date, you can jump back to the moment of its edit. Using the Revert entry to this revision button at the top right of the page, you will undo ALL edits made after this point.

You cannot clear the accumulated history of revisions yourself. After the 50th change, the oldest will automatically disappear from the list.
# View & Save
(regarding block 2)
# Preview
To see what changes and edits look like before you publish them (and thus making them visible to the world) you can open a preview using the button Preview. Then you'll see the page with adjustments as the visitor would see it.

The page that appears is divided into two parts. Adjustments to the content made on the left side can be seen immediately in the preview on the right side.
Since a laptop, tablet or mobile phone has a different screen size, you can also choose the desired screen size of the preview.

Use the Refresh button when changes don’t appear in the preview. The page will be reloaded.

Close the preview page using the button Close Preview on upper left corner.

# View
You can open a new window of the live page (the way a visitor sees it). In order to do so select Primary entry page after pressing the button View.

More options may be available in the dropdown menu, this depends on installed plugins.
# Creating a draft
Use the button Create a Draft when you want to make changes to a live (existing) page without making them visible to everyone immediately.

With the button Apply draft you can save your changes while editing or continue working later on.

To make your changes visible on the live page, use the button Save draft.

When you create a new page you have the option to save it as a draft. This gives you the possibillity to make changes until you are ready to publish it and becoming visible to the world. Above we have described a slightly different way of using concepts, namely making adjustments to a live page that you first want to prepare in draft.
# Save while editing
When you edit an existing item these changes are automatically saved in draft. A blue message 'Showing your unsaved changes.' appears. The Discard button allows you to undo this edit.

These unsaved drafts are conceptual and therefore not yet visible to visitors of your website.
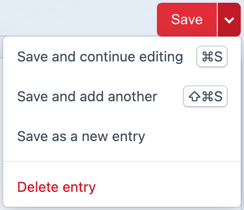
# Save
Changes made can be saved with the button Save in the upper right corner. The system displays a popup notification at the bottom left of the page when this was successful.


Next to the red button you can find a little arrow. Using it will give you some useful options and their corresponding shortcuts.
# Tabs
(regarding block 3)
The details page usually has several tabs. This depends on the setup by the developer.
Almost always you will find a tab called 'Content'. In this tab you can find existing content blocks or add new ones. These blocks contain specific information and are the building blocks of your website. More explanation can be found in the chapter Entries - Matrix Blocks.
# General page details
(regarding block 4)
# Slug
The slug is a snippet from the page URL, usually derived from the title or function of the item and must be unique to a page. If a slug is already used for another page then Craft CMS will automatically provide the slug of the same name with a sequence number. A double slug looks like this: /contact-1. The slug often comes after the domain name. For example, a URL is: https://www.yourdomainname.com/contact
When you view an existing item, in most cases you will find the slug allready filled in. You can modify existing slugs if necessary. In most cases Craft CMS will automatically adjust the corresponding internal links.
Please note that changing a slug changes the page URL. This can cause external links to the page to stop working. A change of URL can also affect your position in search engines.
# Parent
You can choose whether a page should be displayed stand-alone or whether it should be under another page. For example, you can create a menu item (parent) with underlying submenus (child). Click Choose to view the existing structure and make adjustments.
# Author
Name of the author.
# Post Date
Date and time of the item.
# Expiry Date
Expiration date and time of the item. After expiring, the item will no longer be visible on the website.
# Enabled
Switch to activate or deactivate the item. In case of a multisite you can also set this separately per site.
# Status
Displays the current status of the item.
# Notities
Space for adding a short explanation what you’ve changed about an item.