Orders
In this section, we explain how the ordering system works in Commerce. The path of the order can be followed here, from the time of ordering to delivery.
# Orders overview page
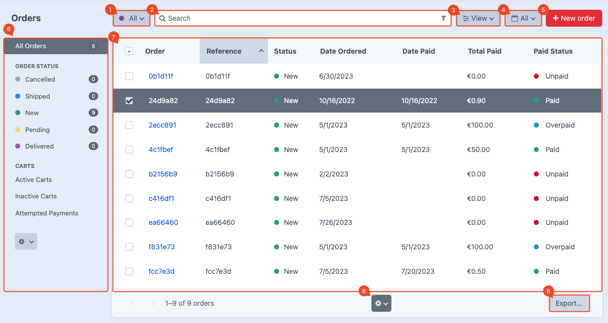
After logging into Craft CMS, the menu Commerce>Orders will take you to the overview page of all orders, regardless of their current status.
# Filter All & Filter Deleted
(image block 1)
This button gives you the option to filter on all orders or to filter on deleted orders. See also Filter menu Order status & Carts for filtering options by order status.
# Search & Filter
(image block 2)
# Search
With the search bar at the top you can quickly find all specific orders by keyword. For example, you can search by name, email, line-item, number, reference, short number, SKU, transaction reference, username etc.

Use the filter button on the left side of the search bar and choose Trashed when you want to search specifically for deleted orders.
Ask the developer to add additional search options if you miss any.
# Filter
While searching, it is also possible to set additional filters. This is useful when, for example, you want to search within a specific date range or particular author. This option can be found under the funnel symbol, displayed on the right side in the search bar.
Click the Add a filter button, a list of possible filter options will now be displayed. Select a filter and click Apply. With Clear, the applied filtering will be removed again.
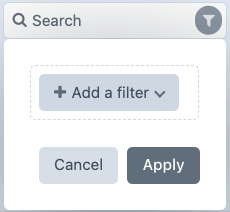
It is possible to set multiple filters at the same time.
When the funnel icon is colored dark gray, you can see that a filter is active. 
# Sort & Columnview
(image block 3)
# Sort
It is possible to sort the view of data in columns, by clicking on the column title or via the View button along the right side of the search bar. You will then come to two buttons to sort from small to large. Also, with Sort by you can sort specifically by, for example, total amount, payment date, etc.
When the sort button is colored dark gray it means that this sorting is active.
Not all columns can be sorted by clicking on the column title.
# Columnview
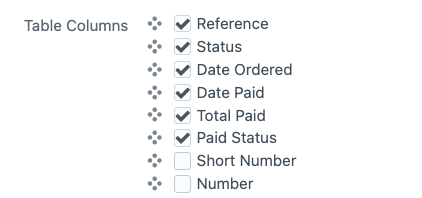
The View button also takes you to the column display settings. Check which column you want to be shown on the overview page. The order of columns can be changed by grabbing the item by the four dots and dragging it to a different place.
# Date filtering
(image block 4)
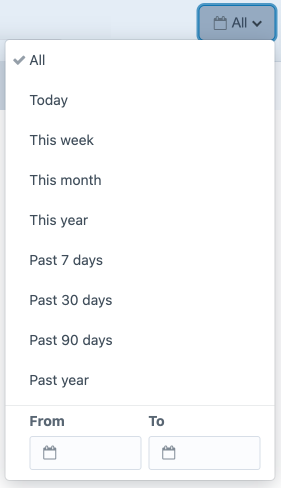
Predefined date selections allow you to filter by order dates. At the bottom of the list of fixed periods, it is also possible to specify your own date.
# New order
(image block 5)
In general, orders come in automatically through the web store section of your webshop. However, in some cases it can be desirable to create an order manually. Think for example when you receive an order by phone.
- The New Order button opens the detail page for the new order,
- Enter the customer’s email address on this page. If this email address is already known in Craft, previously saved address information will be filled. The fields are left blank when the email address is not recognized, fill them,
- Then add the desired products using the Add a line item button, enter the desired quantity and complete with variants and comments if applicable,
- Select the shipping method you want to use for this order in the right bar,
- Save this order using the red Update Order button at the top right. As long as it has not been completed you can find it under "Inactive carts",
- The order is now saved in Commerce but not yet paid for. Share the shopping cart when a payment is required. To do this, go to the gear icon at the top right and choose Share Cart. Copy the link and share it for example via email. When the customer opens the link, the shopping cart is filled with all data. All data can still be completed or changed if necessary. When the customer pays, the order is complete, this will change the status of their order.
Go to the Orders Detail page for more information.
If a new order is marked as completed (this can be by payment or manually) then it is no longer possible to share the cart.
# Filter menu Order status & Carts
(image block 6)
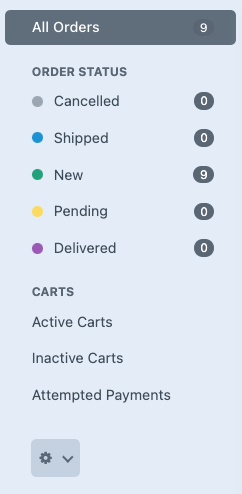
On the left side you will find two sections, the order status and carts.
# Order status
Make a selection under “Order status” to display all orders with this specific status. You can see such a status as a label that is attached to an order and can be fully configured by the developer. Installed plugins can automatically change the order status during the fulfillment process. Easy to quickly see where an order is in the process and what still needs to be done.
Behind the status is a counter of the corresponding number of orders.
In the example of the image, the statuses have the following definition:
| Status | Description |
|---|---|
| Canceled | Orders that have been canceled |
| Shipped | Orders sent to customer |
| New | New orders received, paid |
| Pending | New orders received, unpaid |
| Delivered | Orders delivered |
Change order status
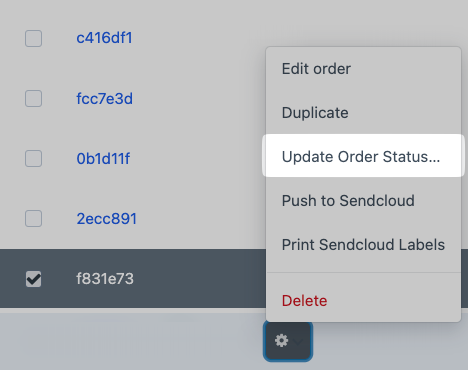
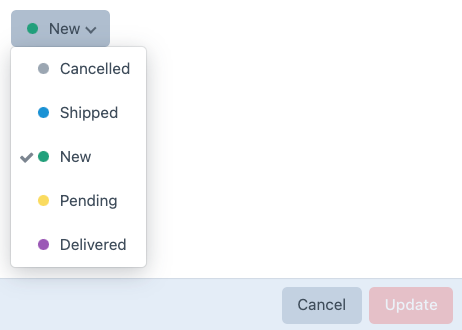
It is possible to adjust the order status of multiple orders simultaneously. Select a specific order status and select one or more order lines. At the bottom of the last order line a cogwheel appears. Click on Update Order Status..., select the desired status and save via Update.
# Carts
Using Active Carts you can filter the carts of visitors who are currently in the process of ordering and checkout. After checkout, the shopping cart turns into an order and will no longer be visible in this view.
Using Inactive Carts you can filter the carts for which no activity has been observed for some time. Together with the developer, you can decide after what time an order should become inactive.
Using Attempted Payments you can filter the carts for which a payment has been started but not completed.
The default value when an order becomes inactive is 1 hour.
# Order overview
(image block 7)
In the order overview you can see all existing orders. Click on the order number to go to the detail page. Some values can still be adjusted. It is also possible to perform bulk actions for multiple orders at once.
# Cogwheelmenu
(image block 8)
The moment an item is checked, a cogwheel appears at the bottom of the page in the center that leads to a menu. This contains various options specific to the selected item.
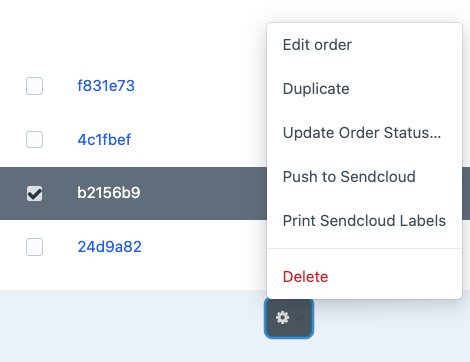
What choices you have in the menu depends on whether one or more items are selected at the same time. Installed plugins may also affect this.
# Export
(image block 9)
The data from a view can be exported via the Export button, for example for the accountant or to make specific overviews or calculations yourself.
Enter a line limit of, for example, 10 if you have a large amount of orders and do not know exactly what the end result of the export will be.
# Orders detail page
After logging into Craft CMS, the Commerce>Orders menu will take you to the overview of all orders regardless of their current status. Click on an order number to open the detail page. Here you will find all the specific details of the order.
# Order details tab
(image block 1)
On the 1st tab Order Details you can find details of the customer, address and ordered products.
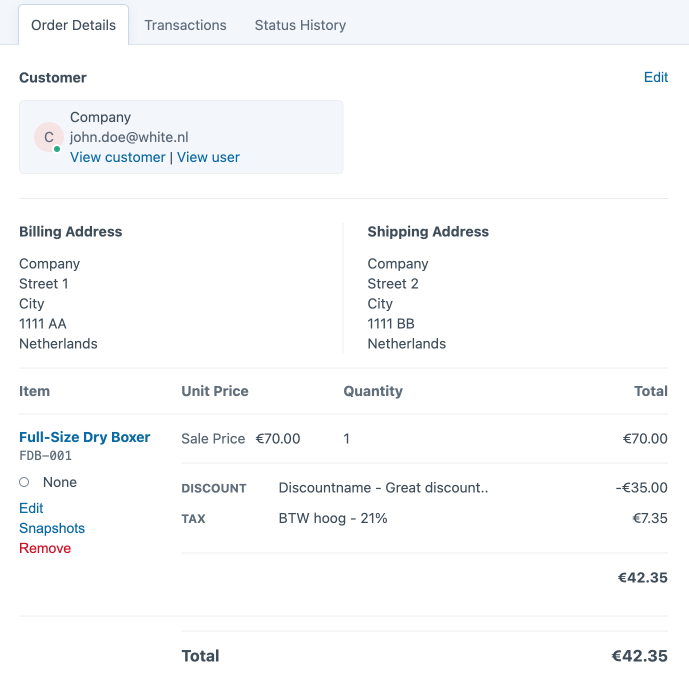
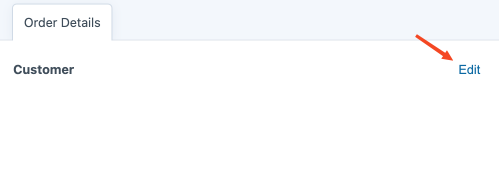
When you want to make changes you need to put the page in edit mode with Edit.
# Billing address & Shipping address
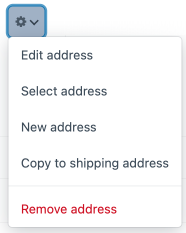
Click on the cogwheel. Choose one of the options Edit address, Select address, New address, Copy to shipping/billing address or Remove address from the menu.
# Add product line to the order (line item)
Click Add a line item to add a product line to the existing order. Check one or more products and choose Add.
# Discounts & Tax
Click the Edit adjustments and the Add an adjustment button to add a line after the subtotal for additional charges such as Tax, Discount or Shipping.
# Recalculate order
Click Recalculate order if you notice that after adding lines the prices are not updated correctly.
# Update Order
Click on Update Order to save the adjustments.
# Transactions tab
(image block 2)

# Payments
When the order has been paid, you will see the corresponding transactions in the “Transactions” tab. In this example, the client paid with Mollie. When you click on the i-symbol, the technical information of the steps made during the transaction pops up in code.
# Refunds
Depending on the options of the linked Payment Service Provider (PSP), it is possible to initiate a refund within Commerce. The advantage of this is that you do not have to log in to the PSP first, find the payment and initiate the refund. An additional advantage is that the widgets are able to represent the correct sales figures and the payment summary is correct.
Enter the amount you wish to refund and click Refund. A line will be added to the list of transactions. The amount of the entry field will be updated. It shows the total amount paid by the customer, after refunds.
Refunds must have a positive value or it will result in an error message.
# Add manual payment
You have the option to add a transaction manually with the button Make a payment. This button only appears when the order has not yet been paid in full or in case of transactions that are initiated manually.
Previous payments are automatically settled, with a manual payment only the outstanding amount is shown.
# Status history tab
(image block 3)
Every time the status of an order changes, it is logged. In this tab you can find the complete history of the route that the order has made in chronological order. Useful, for example, to quickly find the moment of shipment when a client asks for it.

# Overview
(image block 4)
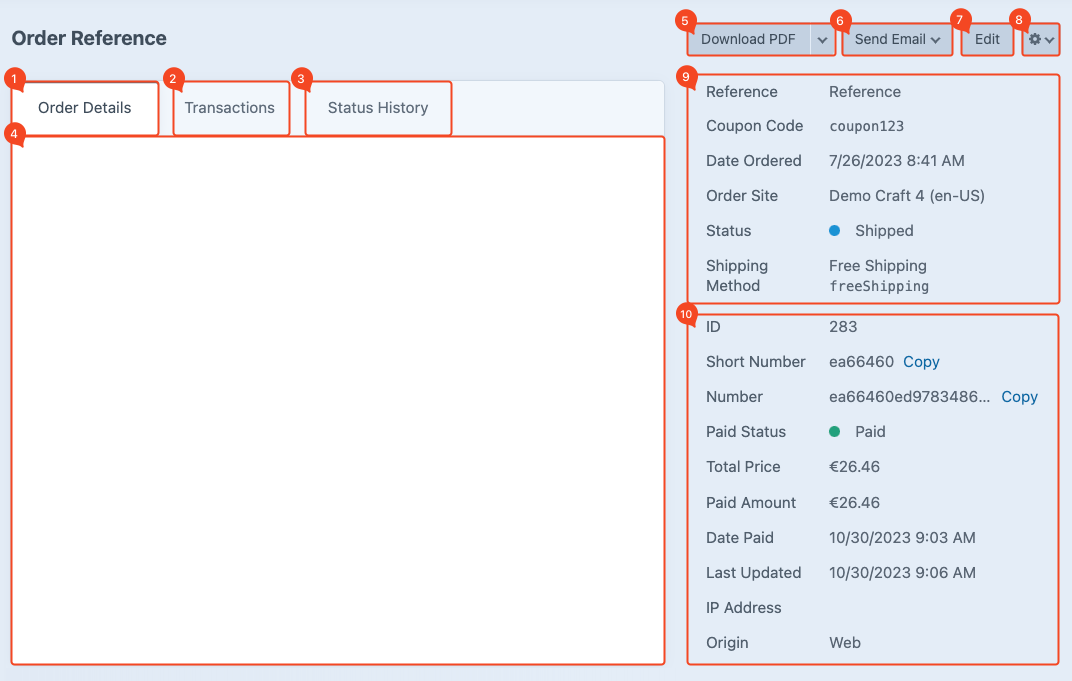
The overview page shows at a glance which settings apply to the selected tab. The detail page shows which specific settings can be made.
# Download PDF
(image block 5)
With this button you can have a PDF generated related to this order. This can be an invoice, but also PDFs with order or shipping information. If more options are available then a dropdown menu appears with the available options.
This button will only be visible when a PDF is actually available for download.
# Send email
(image block 6)
It is possible to set up different email templates in Commerce as for example for manually emailing an order confirmation. From the dropdown you can choose the different email templates when they are set up.
Setting up email templates can only be done by the developer.
# Edit
(image block 7)
Put the order in edit mode with the Edit button. Regardless of where you are at that moment on the detail page and tab, all fields that are editable can now be edited. Leave this mode again with Cancel or Update Order or use the cogwheel.
The same can be achieved with the blue Edit button in the “Order details” tab.
# Settings
(image block 8)
It is also possible to delete an order at a detailed level. This is the only function of this settings button. Go to Cogwheel>Delete.
After you have clicked Delete, there will be no warning. The change will be implemented immediately!
# Order & shipping information
(image block 9)
Existing order information can be adjusted afterwards with the button Edit. This can be useful when a customer passes on a change afterwards. For example, if they want to pick up the order themselves instead of having it shipped, etc.
# Reference
A unique number can be displayed here. The developer can determine during setup what the number and sequence should be.
Sometimes it is possible that a customer wants to add their own reference to the order. This can be done by the developer via a so-called 'custom field'. The customer then will see an extra field in the checkout in which the reference can be entered. For example a PO number.
# Coupon Code
When a customer has used a discount code, it is stated here. Discount codes are set up separately in Commerce. You can find an explanation about this subject in the chapter Promotions.
# Date Ordered
Orderdate and time.
# Order Site
Website location where the order came from. This is especially interesting to know in case of a multilingual or multisite.
# Status
Shows the current status of the order. Go to the Order status page for more information.
# Shipping Method
Displays the selected shipping method.
During the development of your website, Commerce can be set up to take into account the weight of a product. Depending on this weight, Commerce is then able to choose the right shipping method. This shipping information can be passed on automatically to your logistics partner.
# Order numbers & payment information
(image block 10)
The information in this block is not editable.
# ID
Unique order number. Commerce hands out this number itself. The number is increased by 1 with every subsequent order.
# Short Number
This is a unique number that is given to the order by the system. This is usually a part of the number described below.
# Number
This is a unique number that is given to the order by the system underwater. Craft uses this number to build a URL, for example. When you want to share the contents of a shopping cart with someone, the copied URL contains this unique number.
# Paid Status
When a Payment Service Provider (PSP) is linked, the customer gets the option to make a payment during the order. The PSP then informs Commerce whether or not the payment was successful. An example of a PSP is Mollie.
# Total Price
The amount that the customer has to pay, so the total price of the order including shipping costs and VAT.
# Paid Amount
The amount the customer has paid. This information is received from the Payment Service Provider (PSP).
# Last Updated
This is the last date when a change was made. In most cases this will be the payment date or a mutation of the Payment Service Provider (PSP).
# IP Address
This is the IP address of the purchaser. Useful to know when for example fake orders have been placed from a certain IP address. This number can be put on a blacklist in order to prevent further abuse in the future.
Every connection from a location to the outside has a unique number, the internet IP. It works as a kind of telephone number where computers can exchange information.
# Origin
An order can be placed through the webshop or by an employee creating an order in Commerce. These are identified by "Web" or "Control Panel."